THIS BLOG HAS MOVED

Dear reader, this blog was a nice place for quite a while to share my thoughts and stories. Meanwhile I got a new website and so I continue writing on my new's site blog.

HOP OVER TO THE NEW BLOG

Thank you.

Liebe Leserin, dieser Blog war für lange Zeit ein sehr netter Ort, meine Gedanken und Geschichten mit dir zu teilen. Inzwischen habe ich eine neue Website erstellt und werde jetzt den Blog dort fortsetzen.

GEH EINFACH ZUM NEUEN BLOG,

und: "Danke!"

Sometimes you wanna simply say

Donnerstag, 30. Juni 2011

Thank you

Today the postman rang at my door with a parcel. Inside there were 5! Quilt tops for my longarm service. “Who sends you five tops in one go?” you may ask.
I guess everyone who has clients knows about those you have a quality relationship to: they are loyal, friendly, supportive and you feel connected to them. And sometimes you feel the urge to say a big “Thank you”.

A thank you for recommendations and word-of-mouth influence which brought often new customers to me and also opportunities for classes. And a thank you for being inspirational and networking, bringing together quilters of all corners. A thank you for gathering quilts in her group and keep the postman on the go:

Thank you, Martina!

Heute klingelte es an meiner Haustür und da stand der Postbote mit einem dicken Paket. Da drin waren 5! Quilttops. Vielleicht fragst du dich jetzt, wer mir so viele Tops auf einmal schickt?

Ich vermute jeder, der Kunden hat, hat welche, mit denen es eine besonders gute Verbindung gibt: sie sind loyal, freundlich, unterstützend und man fühlt sich ihnen verbunden. Und manchmal hat man einfach mal das dringende Bedürfnis, ein dickes „Dankeschön“ zu sagen.

Dankeschön für Empfehlungen und Weitersagen, was mir schon einige neue Kundinnen, Aufträge und Kurse eingebracht hat. Aber auch ein Dankeschön, dafür andere zu inspirieren, mit dem Blog zu unterhalten und auf diese Weise Quilterinnen aus allen Ecken und Enden miteinander in Verbindung zu bringen. Und eben auch ein Dankeschön dafür, Tops in der Patchworkgruppe zu sammeln und den Postboten auf Trab zu halten:

Danke, Martina!

Fabric choices for the modern quilter

Dienstag, 28. Juni 2011

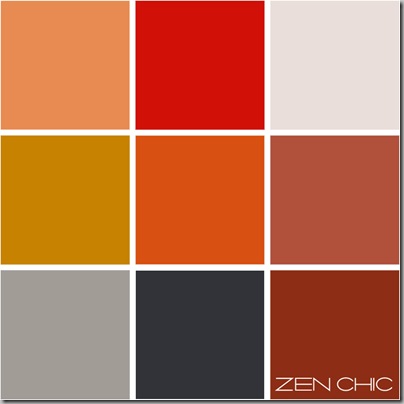
In my post "color choices for the modern quilter" of last week I presented a color chart developed of shades of orange, grey and graphite. Do you remember? And now see which fabrics I found for my color combination. 

Color choice Fabric choice 
(I can't resist dots. They always add some kind of fun to a quilt).
It's (from left to right)

  1. Wee woodland, Keiki, Moda
  2. Dapple (red), Brandon Mably, Westminster
  3. Lily & Will II, Bunny Hill (Anne Sutton), Moda
  4. Millefiori, Kaffe Fassett, Westminster
  5. Ring Dings, by Holly Holderman for Lake House
  6. Wee woodland, Keiki, Moda
  7. Mixmasters-Dot to Dot by Patrick Lose for Robert Kaufman
  8. lack orange dot (unknown, found at Del Ray Fabric Shop)
  9. Aboriginal Dot, Kaffe Fassett, Westminster
Next week I'll show you a modern quiltpattern out of these fabrics.

By the way: One of my favorite fabric shops with a wide range of up to date prints for modern quilters is "Del Ray Fabrics". Don't miss to check out what they have in stock.

Letzte Woche habe ich eine Farbkombination vorgestellt mit Tönen aus warmem, sonnigem, poppigen Orange, zurückgehalten von einem milderndem Graphitgrau.
Und hier ist nun meine Auswahl an modernen Stoffen, die diesen Farben entspricht. Nächste Woche gibt es dann einen Quilt aus diesen Stoffen...

Puzzle Box Quilt Along – Join me

Sonntag, 26. Juni 2011

Puzzle Box Quilt

Quite for a while I had the idea to work on a quilt made only by solid precuts, and when I got a Moda layer cake of Bella Solids Warm Pastells I knew that's it.

Bella Solids warm pastell

Using these precuts will make a block size of 8.5" and using 6 rows of 6 blocks will give you a lap quilt of 51" x 51". Adding a wide solid border makes a quilt large enough to cover a bed. So it's up to you which size you want end up with.

There are a lot of delicious layer cakes on the market, and prints will do also. But I think solids, marbles or small scale prints are perfect to stay in the minimalistic and simple style of this quilt pattern.

So – what do you need?
Just 1 layer cake (40 pieces of fabric, each 10" x 10")
and if you like to enlarge the lap size to  bed quilt add 3 1/2yard of a fabric for the border.

Here’s the schedule for those of you that like to plan ahead…Friday July 1st – cutting instructions
Friday July 15th – piecing
Friday July 29th – quilt top assembly
Friday August 12th – wrap up

I’ll be posting progress in on the flickr group and also here on the blog.

Why don’t you join me and grab the button?

Grafik2

I hope you do!!!!

Schon eine ganze Zeit lang hatte ich die Idee, mal einen Quilt nur aus einfarbigen Precuts zu machen, einfach sollte er sein und minimalistisch, und als ich dann ein Moda Layer Cake mit sanften warmen Pastelltönen geschenkt bekam, wusste ich – das ist es.

Wenn man diese Precuts benutzt, erhält man eine fertige Blockgröße von 8.5" (etwa 21,5 cm) und das zusammengesetzte Mittelstück von 6 Reihen à 6 Blöcken ergibt eine schöne Kniedecke von 130 cm x 130 cm. Möchte man einen ganzen Bettquilt daraus herstellen, dann näht man einfach einen Rand in der gewünschten Größe darum herum.

Es gibt so viele schöne Layer Cakes zu kaufen, dass die Wahl bestimmt schwer fällt, doch um diesen minimalistischen, einfachen Charakter des Quilts noch zu unterstreichen, ist es am Schönsten, einfarbige Stoffe, Marbels oder sehr klein gemusterte Basics zu verwenden; so wird es am plakativsten.

Man braucht:
1 Layer Cake (40 Stoffquadrate à 10")
und für den Rand eventuell noch 3,5 m zusätzlichen Stoff.

Und hier ist der Zeitplan für die Quilt Along Anleitung:
Freitag, 1. Juli - Zuschnitt
Freitag, 15. Juli – Blöcke nähen
Freitag, 29. Juli – Quilt Top zusammensetzen
Freitag, 12. August – Quiltfinish

Über die Fortschritte werde ich hier posten und außerdem gibt es eine flickr group, bei der jede, die Lust hat mitzumachen, natürlich ihre Fotos einstellen kann.

Mach doch einfach mit, markiere deinen Blog mit dem Button oben und lade deine Freundinnen dazu ein. Ich freu mich auf Euch!

Technorati-Tags:

Tutorial for fabric luggage tags

Freitag, 24. Juni 2011

luggage bag tutorial

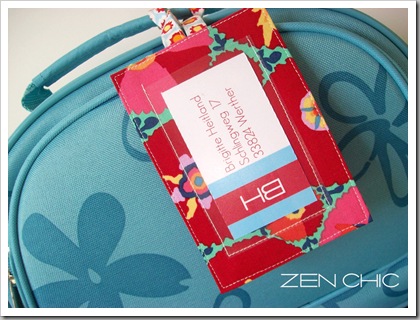
Summer time - travel time, suitcases are to be packed and on my last shopping tour there were some catching my eye, which I simply had to take with me: A wonderful fresh blue – goodbye to the old black ones. And now – what about a little bit cream on the top: adding cute luggage tags? Those I have discovered a while ago browsing at Interweave (an idea from Helen Gregory) and I couldn’t resist. So here is how I did mine.

BTW: If there's a catchy tune, is there perhaps such a thing like a catchy view too, something you see over and over again? For me right now it seems to be the combination of azure blue with red, I thought my tags should contrast with the luggage quite a bit.

Materials:
Two fabric rectangles for front and back: each 4 ½“ x 6 ¼“
For strap: 1 strip 2“ x 14“
2 rectangles of heavyweight stabilizer: each 3 ½“ x 5 ¼“
clear plastic vinyl for name pocket: 2 ½“ x 4“
name card: 2“ x 3 ½“
glue stick

  1. Center one stabilizer rectangle on the wrong side of the front fabric rectangle.
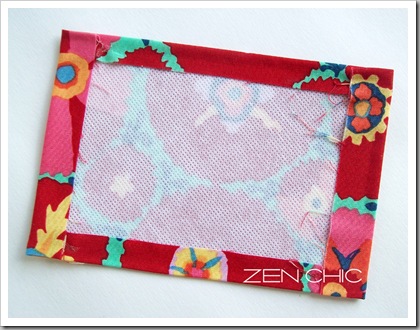
  2. Apply glue along the edges of the stabilizer rectangle and wrap the edges of the fabric rectangle up and over the edges of the stabilizer.
  3. Repeat this process with the second stabilizer rectangle and the back fabric.
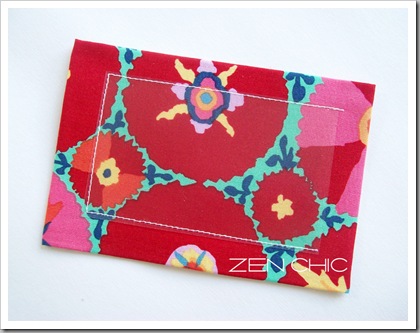
  4. To make a pocket for the name / address card, center the clear plastic rectangle on the right side of the front fabric. Topstitch close to the edge around three sides, leaving one short side open.
  5. To prepare the strap, fold the concerning fabric stripe lengthwise; press. Then open the strip and fold each long side in to meet the fold line; press. Topstitch close to the edge along both lengthwise edges.
  6. Layer the two prepared rectangles, wrong sides together. Fold the strap in half and tuck the raw ends in between the wrong sides of the rectangles, centering the strap along one of the short sides.
  7. Topstitch around all four sides, being sure to catch the strap in the seam.

And now I'm looking forward to my next trip to Vienna with my two favorite suitcases!

 luggage bag tutorial luggage bag tutorial luggage bag tutorial luggage bag tutorial 

Sommerzeit – Reisezeit, die Koffer werden gepackt und bei meinem letzten Einkauf sind mir welche ins Auge gestochen, die ich einfach mitnehmen musste. Wunderbares frisches blau, raus mit den alten verstaubten Schwarzen. Und jetzt noch ein schönes Kofferlable dran. Diese hier habe ich mal vor einiger Zeit beim Stöbern bei Interweave entdeckt, die Idee stammt von Helen Gregory und ich fand sie so schön, dass ich hier mal ein Tutorial dafür vorstelle.

Wenn es einen Ohrwurm gibt, gibt es dann eigentlich auch so etwas wie einen Augenwurm, etwas was man überall und immer wieder sieht? Bei mir scheint es gerade die Kombination azurblau mit rot zu sein: denn die Labels – fand ich – sollten ruhig ein bisschen kontrastieren.

Was man braucht:
Quiltstoff für die Vorder- und Rückseite: je 1 Stück 4 ½“ x 6 ¼“
für das Bändchen: 1 Streifen 2“ x 14“
starke Bügeleinlage: 2 Stücke, 3 ½“ x 5 ¼“
ein Stück Plastik (aus einer Sichthülle geschnitten): 2 ½“ x 4“
Adresskärtchen: 2“ x 3 ½“
Textilkleber

  1. Ein Rechteck der Bügeleinlage auf die linke Seite des Vorderseitenstoffs zentriert aufbügeln.
  2. Klebstoff auf die überstehenden Stoffkanten auftragen, und die Kanten um die Bügeleinlage herumschlagen und festdrücken (bügeln).
  3. Auf dieselbe Weise wird die Rückseite vorbereitet.
  4. Für die kleine Adressetikettentasche auf der Vorderseite wird das Plastikstückchen zentriert in der Mitte festgesteppt, wobei eine schmale Seite offen bleibt.
  5. Für das Bändchen wird der Streifen längs zur Mitte gefaltet und gebügelt. Dann wieder geöffnet und die Kanten zum Mittelkniff hin gefaltet, gebügelt und dann knappkantig abgesteppt.
  6. Die Vorder- und Rückseite werden nun links auf links aufeinander gelegt, wobei man das Bändchen an einer schmalen Seite mittig dazwischen fasst. Anschließend rundherum knappkanting absteppen. Voilà – fertig!

Und ich freu mich auf meine nächste Reise nach Wien mit den zwei Gute-Laune-Koffern!


Technorati-Tags:

Color choices for the modern quilter

Dienstag, 21. Juni 2011

Orange is just wonderful - it smells fresh and fruity, it is as warm as sunshine, it tastes as aromatic as mangoes, it lifts your spirits on a rainy day and sounds like pop music.
No wonder that these orange shades inspired me immediately for a color palette. And I found a lot of suiting fabrics – I’ll show them soon.

Do you like orange? Have you ever sewn a quilt in orange? Let’s see it and post a link in the comments!


Foto Tom Magliery


Orange ist einfach wunderbar – es riecht so nach Frische und Frucht, es ist so warm wie ein Sonnenstrahl, es schmeckt so aromatisch wie Mangos, es macht gute Laune an Regentagen und hört sich an wie Popmusik.
Kein Wunder, dass mich diese vielen Orangefarbtöne sofort für eine Farbpalette inspiriert haben. Und Stoffe dazu habe ich auch eine Menge gefunden, die zeige ich Euch bald.

Magst du orange? Hast du schon mal einen Quilt in orange genäht? Dann poste einen Link im Kommentar!

Beach bag tutorial for quilters - A great script from the Film In The Fridge blog

Freitag, 17. Juni 2011

Foto and Tutorial from Ashley, Film in the Fridge Blog


Summer holidays are just around the corner, swimming season is enticing and a great beach bag would be just the right thing. This one is sewn in an afternoon, and with some lovely fabrics it could become your summer favorite. By the way, many (quilt) fabrics from well known designers are available as water-repellent laminate also – which makes a perfect bag lining for all the wet suits.


Go to Ashley's Tutorial

Die Sommerferien stehen vor der Tür, die Freibadsaison lockt und eine tolle Badetasche wäre jetzt genau das Richtige. Diese hier ist ruck-zuck genäht und könnte mit dem aktuellen Lieblingsstoff der Taschenfavorit des Sommers werden. Übrigens gibt es inzwischen von ganz vielen Quiltstoffdesignern die Stoffe auch als wasserabweisendes Laminat – prädestiniert als Innenseite für die nassen Badesachen.


Das ausführlich bebilderte Tutorial gibt es hier.

Pattern choices for the modern quilter

Dienstag, 14. Juni 2011

Last week I showed my fabric selection for the azure-blue/lacquer red color choice here in the blog and this is the quilt I've designed of these materials: A picturesque background of shades of blue with accents of black, yellow, terracotta and a very eye-catching bright red.

I thought a plus quilt pattern might look good for these colors. What do you think about the red crosses?

Letzte Woche habe ich für die Farbauswahl “azurblau-lackrot” eine Stoffzusammenstellung von modernen Stoffen im Blog vorgestellt, und dies ist der Quilt, den ich aus diesen Stoffen zusammengestellt habe: Ein malerisches Ineinanderfließen von Blautönen mit den Akzenten von Schwarz, gelb, terracotta und als Hingucker ganz leuchtendes Rot.

Ich dachte ein Plus-pattern würde gut zu diesen Farben passen. Was denkt ihr über die „roten Kreuze“ :-) ?

.

 
site design by designer blogs